Tilføj ekstra telefonnumre til DUO 2FA konto/login
- Åbn DUO Admin Panel https://admin-bd26ed8e.duosecurity.com/
- Find bruger i DUO Admin Panel under brugere/users
- Tryk på “Add Phone” og indtast nummer (selvom der er et telefonnummer registreret i forvejen)
- Tryk på “Activate/Reactivate Duo Mobile” på det nye nummer
- Hvis der er autopush på serveren, skal det slås fra, for ellers sender den kun login til det øverste nummer på brugerlisten
- For at slå autopush fra, skal man logge på den pågældende server og ind i Registry Editor (regedit.exe). Man skal være administrator for at kunne slå det fra. Det gælder for alle brugere på serveren, og i stedet for at den kommer op på telefonen af sig selv, skal man trykke på “Send Me a Push” for at sende en forespørgsel til telefonen
- Sti i Registry HKLM\SOFTWARE\Duo Security\DuoCredProv
- Find AutoPush DWORD Set to 0 to disable automatic push or 1 to enable it.
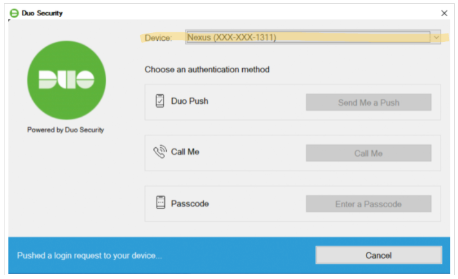
Det er nu muligt at vælge hvilken telefon man vil logge ind på serveren med.
https://help.duo.com/s/article/6964?language=en_US
https://duo.com/docs/rdp-faq#how-can-i-configure-automatic-push?
English
Step 1: Log in to the DUO Admin Panel
The first step is to log in to the DUO admin panel. Open your web browser and go to https://admin-bd26ed8e.duosecurity.com/. Enter your login credentials and click on the “Log in” button.
Step 2: Find the User in the DUO Admin Panel
Once you are logged in, go to the “Users” section in the DUO admin panel. Search for the user you want to add a new phone number for and click on their name.
Step 3: Add the New Phone Number
On the user’s page, click on the “Add Phone” button. Enter the new phone number you want to add, even if there is already a phone number associated with the user. Then, click on the “Activate/Reactivate Duo Mobile” button for the new phone number.
Step 4: Disable AutoPush (If Necessary)
If there is AutoPush enabled on the server, it will send login requests to the first phone number associated with the user. To disable AutoPush, log in to the server and open the Registry Editor (regedit.exe) as an administrator. Navigate to HKLM\SOFTWARE\Duo Security\DuoCredProv and find the “AutoPush” DWORD. Set the value to 0 to disable AutoPush or 1 to enable it.
Step 5: Choose the Phone Number for Login
After adding and activating the new phone number and disabling AutoPush (if necessary), the user can now choose which phone number to use for DUO authentication when logging in.